Today we are going to look at 2 most popular Keikai demos: Work with Database and Secured Data Processing. We will explore what the demos are about and when they are most beneficial. Now let’s start the tour!
Work with Database
While it is perfectly fine to import an existing Excel file containing all the data, formulas and styles into Keikai for editing, and then save it back again as an Excel spreadsheet (like the Excel-like demo); a different but interesting way of using Keikai is to associate the data with the database instead of keeping them in the cells.

This is useful if you:
- Wish to put your data in a centralized place (ex. a database) instead of having the data floating around in everyone’s computer
- The data in the DB can be queried, can be brought to (or come from) other applications and services
- Business users can still see and analyze the data in the familiar Excel-like way
Let’s explore this use case now!
See it in action

How it was done
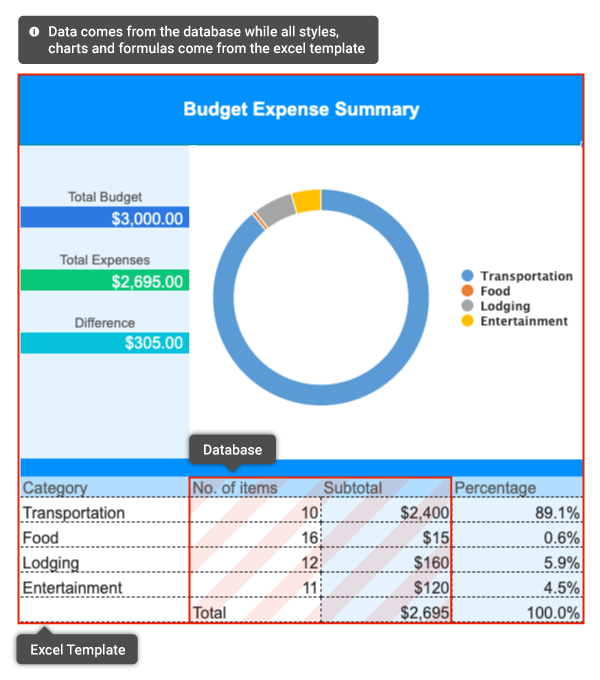
Prepare the Excel Template: Spreadsheets are powerful because they empower domain experts to code their logics and design the UI by themselves. We definitely want to keep this value -- so the first step, we are going to have a template designed by the business users (domain experts) in Excel.
Wire Data: All we do differently is that we wire the data to the database - we populate desired values into corresponding cells, and save them back to the DB once they are processed. Keikai’s Range API is useful for this.
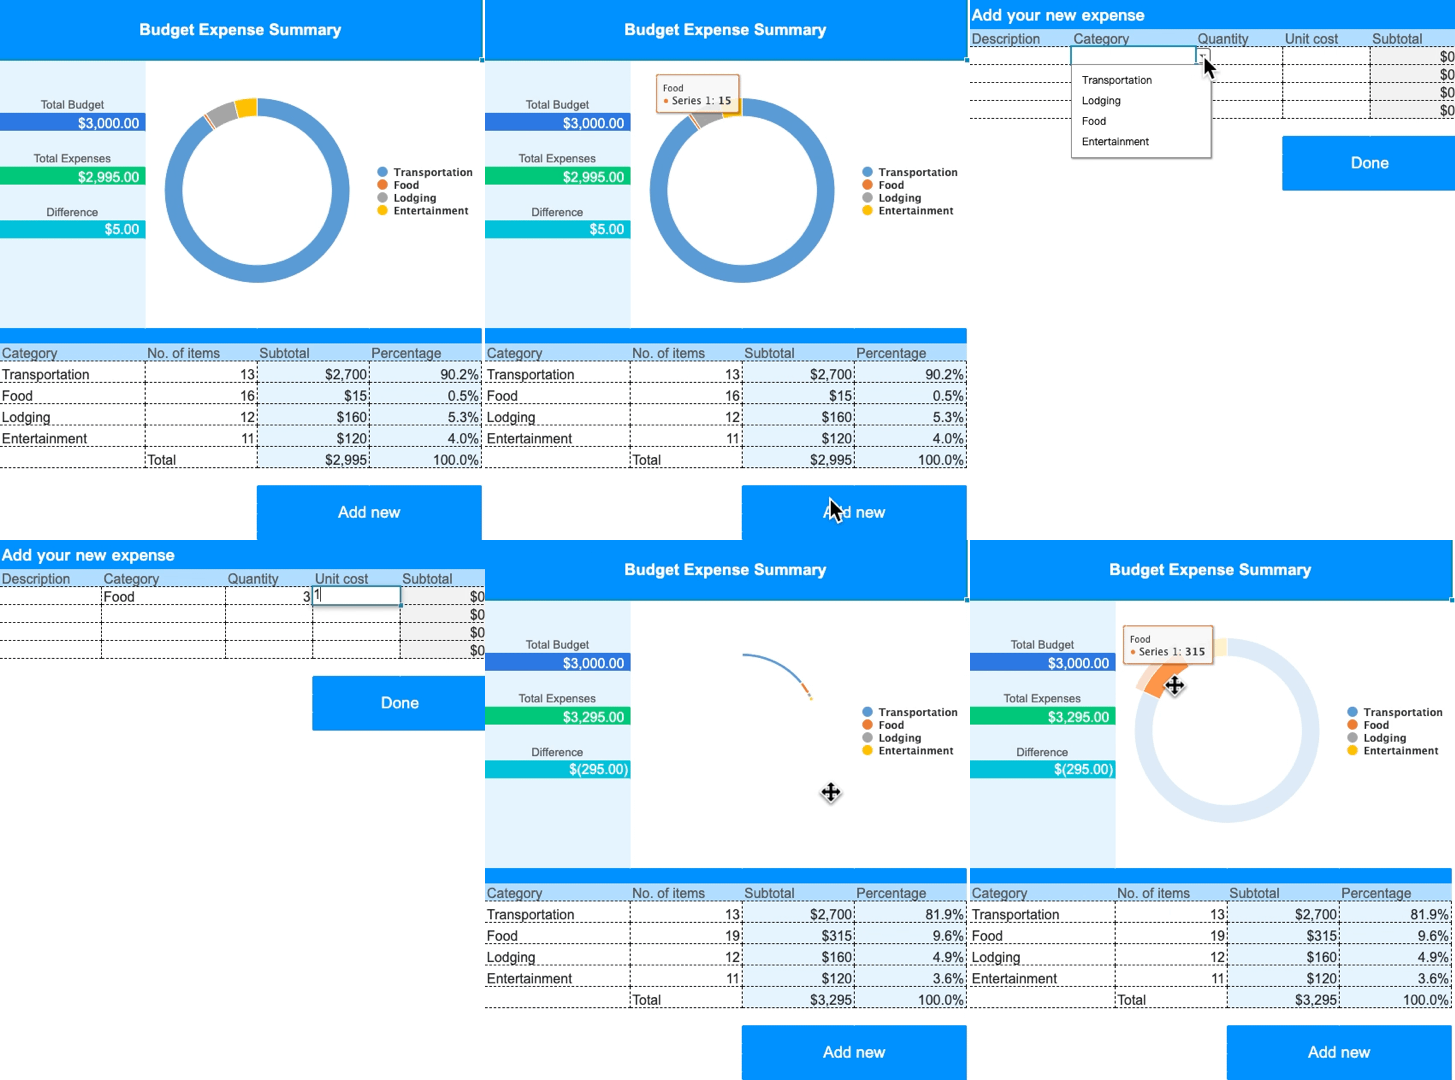
Wire Actions: In the demo we noticed that when clicking on the “Add” button, it navigates to the 2nd page. This is done by registering an onClick event listener to the Button and when it is triggered, performing the navigation action. Similarly, we registered an onClick event listener to the Done button on the 2nd page. When it is triggered, we save the cell values into the database, and navigate the user to the 1st page. Once the data in the DB is being updated, we can initiate corresponding values cells and charts to update with the new value.
If you are more technical, go to the actual demo and click on the Controller tab to see the corresponding source code.
Variation
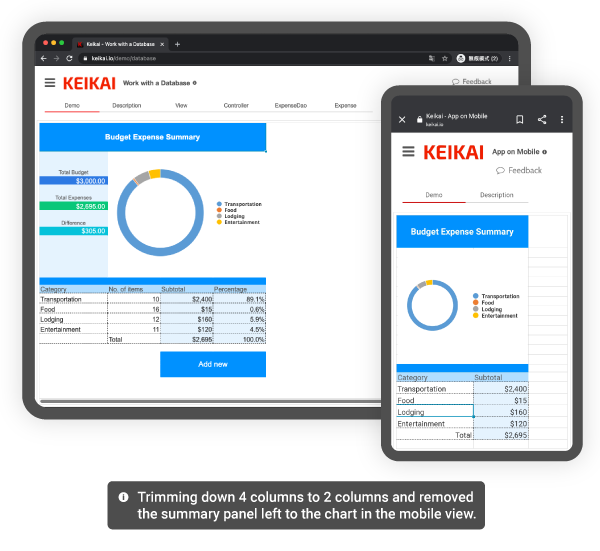
A similar example is done for mobile devices. From an application developer’s point of view, there's no technical difference in creating a keikai-app for a desktop browser or a mobile browser. The only difference is the screen size. Due to the nature of a mobile device having limited visible range, when designing a mobile spreadsheet application you should consider to display a suitable (smaller) range that is easier for the user to navigate and use. If you compare the desktop and the mobile version, you will notice that we are making the mobile app concise and containing only the essential information.

If you are aiming at supporting both devices, we recommend you to detect the device and then guide the user to either the mobile version or the desktop version for best accessibility.
Secured Data Processing
The 2nd demo I would like to talk about is a common input-output calculator-like use case.
Assume you have designed a calculator or a complex financial model in Excel and you wish to share it to your users, allowing them to input some values and get the calculated results. At the same time you don’t want them to see the underlying formulas or domain knowledge you encoded in the sheet -- this demo is exactly what you need to check out.

See it in action
As an adiministrator you can design the sheet and update the formulas:

The end user can only input data and view the result:

How it was done
Prepare your Excel calculation sheet: Assume your Excel file has two sheets, the first sheet contains input and output, and the 2nd sheet contains your calculations. (if your case is different, no worries, we will mention it in another section later).
Define WHO can access WHAT: We need to design what we want to show to the users, and what we don’t want to.
For example,
A. we may want to show the end users only the input-output sheet, and we want to hide the “calculation/model” sheet from the users.
B. on the input-output sheet, we want them to only be able to input the “input cells” - those colored in orange. We don’t want them to (accidentally) alter any other cells.
C. under the admin view, we may wish to be able to see everything (both the input-output sheet and the model sheet).
D. under the admin view, we may wish to be able to make changes to the style, layout and formulas.
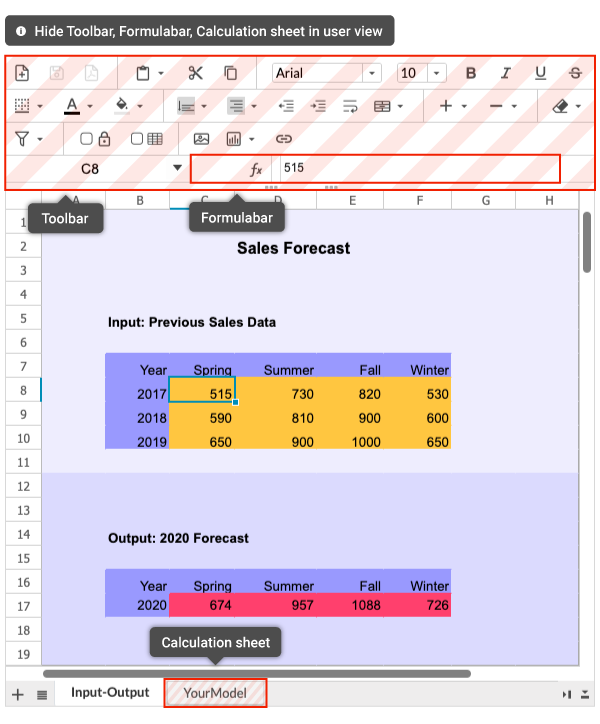
Protect the Sheets and Cells: With these rules clearly set in mind, we can import and dynamically protect the sheets and cells based on our design. In the admin view, everything is accessible and nothing is hidden, so no specific setting is needed. In the user view, permission control can be easily done by using the Range API and protectSheet API - specify which range to protect, and what action to protect. We may want the user to be able to select a cell but not being able to change it, or we may want nothing to be selectable - all under our control. We can also use setShowToolbar (false), and setShowFormulabar (false) to hide the formula bar and unused toolbar under the user mode.
If you are more technical, go to the actual demo and click on the View Source tab to see the corresponding source code.
Variation
If your input-output and your formulas are mixed on the same page, no worries. We can also protect the cells in the same sheet - allowing users to input only the input cells, and view all other cells, without exposing the underlying formulas. Again, this can be done easily by setShowFormulabar (false), and use Range and protectSheet to prevent users from selecting (copying) the sensitive cells in the User View.
Summary
In this short blog I talked about two common use cases: The first case being having your data sit in the database while presenting it in an Excel-based template. This allows you to centralize your data and have the flexibility to bring your data to/from other services and applications. The second case being sharing your calculation sheet while protecting your formulas - creating an easy-to-access environment for your end users while safeguarding your domain knowledge and secret formulas.
