application · May 20, 2021
Bringing intuitive input controls to the web spreadsheet user experience with Java
 Matthieu Duchemin
Developer, Keikai.
Matthieu Duchemin
Developer, Keikai.
Introduction
A spreadsheet is a particularly useful way to display and exploit tabular data, or just formatted content. Generally, the user will fill in data simply by typing it and modify the properties of cells using the sheet controls.
However, some data types can be challenging for free typing. A date can be easily misinterpreted if the format is incorrect for example. Or you may need the user to freehand a signature before printing.
In this article we will demonstrate an example of integrating intuitive input controls to a spreadsheet to bring better usability.
Mapping data types to appropriate controls
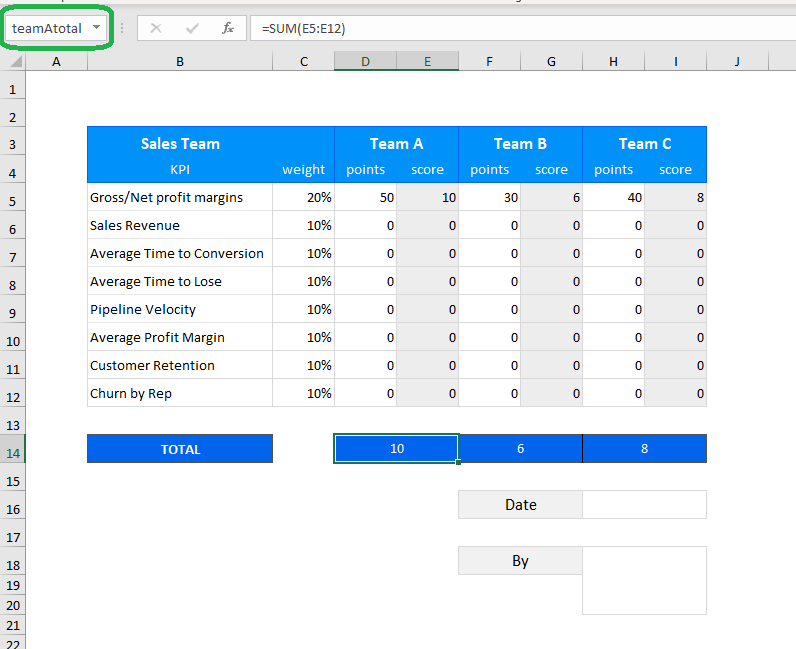
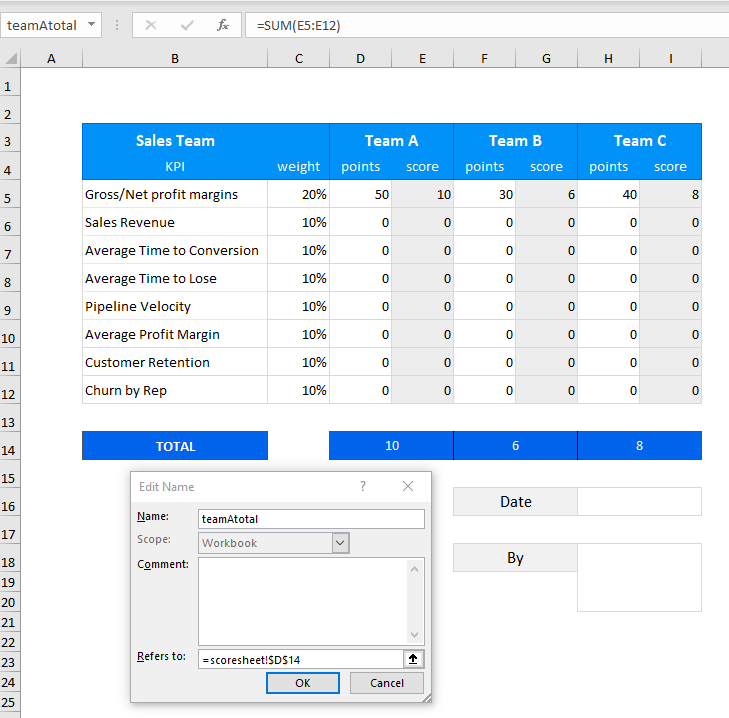
Assume we have an Excel scoresheet with different data types that the user is required to fill. We assign points to three different teams, which are calculated from a base value, and multiplied by a coefficient.
Each team is also assigned a color.
Once the form has been filled, it is dated and signed for approval.

Now the goal is to replace these free-tying input spreadsheet fields with the matching web components to upgrade the usability and lower the risks of getting incorrect data. In this example I am using ZK Framework to do the work.
Coefficient: Since this is a percentage value bounded between 0 and 100%, we can represent it with a simple slider.

Score: A simple integer value, it is easily filled in with a spinner to support increments and decrements.

Team color: the colorpicker component is a natural fit to let the user choose either a preset or a custom-picked color.

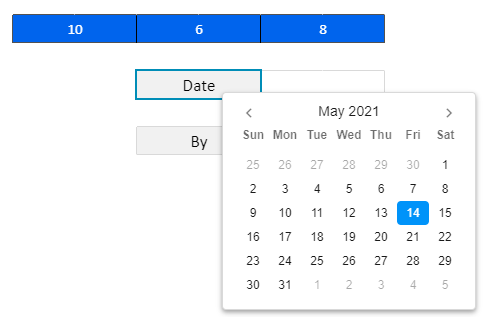
Date field: The calendar component is a great fit to select a date without running into formatting or date calculation difficulties.
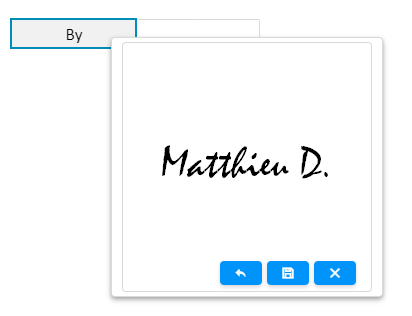
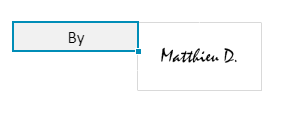
Signature: The signing action require a dedicated freehand signature input such as the signature component. The resulting image can be added simply by adding an image to the spreadsheet.
Drawing in the signature box:
Embedded result as image in the sheet:
Implementation
The following implementation is available as a runnable sample in this github repository.
General design
In this page, we rely on the spreadsheet as the main user-interactable item. The spreadsheet will act as the entry point for each of the workflows we will implement.
When the user clicks on a marked area of the spreadsheet, we will open a ZK popup containing a ZK input method appropriate for the data type used in the cell. A percentage will be matched to a slider, etc.
Once the input component has registered a change, we will close the popup and write the result of the component input back to the main spreadsheet, at the relevant location based on the cell that was clicked.
This returns the focus back to the main spreadsheet, and let the user make additional operations, such as opening a different popup on a different cell.
Spreadsheet design
By their nature, spreadsheets are highly mutable. They can be modified by any user, and the ability to quickly update a sheet to match the latest requirements is a valuable feature.
As such, we want to avoid using hardcoded cell positions in our page logic. Let us say we were to choose an arbitrary cell for one of our fields, for example A10. If another line is added to a table, or deleted entirely, the location of that field may have moved to cell A9, or A11.
A better way to map our fields to our logic is to use named ranges. Named ranges are an easy way to “tag” a cell or a collection of cells with a user-defined name.
For example, in our current sheet, Cell D13 is the current team A total.
Here's a sample of the spreadsheet available in the git repository.
We can define these names simply using the name field, or by using a more in-depth feature like the name manager.
Keikai events
We are using a Keikai spreadsheet as the main component of our page. As a component of a ZK page, the spreadsheet can listen to certain events triggered by the end-user. Our main control source is the page composer. A page composer is the java class controlling the page.
In this case, we will listen to the mouse click event when triggered on the spreadsheet, using the Listen annotation from our SelectorComposer.
@Listen(Events.ON_CELL_CLICK + "=spreadsheet")
public void onCellClick(CellMouseEvent e) {
    if (RangeHelper.isRangeClicked(e, teamRange))
        contextPopupTeamColor(e);
The event will provide information regarding the cell that was clicked.
If the cell is in one of the named ranges defined in our spreadsheet, we can decide to do something relevant for each specific ranges.
Component wiring in depth
The wiring of each of these components is done under the same principles.
Creating a popup
The popup is a component. Its function is to act as a container for other components and be displayed at a given anchor in the page. The anchor can be the mouse position, or a different component already existing in the page.
We simply instantiate a popup component and add it to the page:
Popup pop = new Popup();
pop.setPage(spreadsheet.getPage());
Listening to component events
The thing we need to put in place is the event listeners to be invoked when the end-user interact with the input components. In this example, we want to listen to the ON_CHANGE event, which is triggered when the calendar’s date is changed.
calendar.addEventListener(org.zkoss.zk.ui.event.Events.ON_CHANGE, (Event evt) -> {
    targetCell.setCellValue(calendar.getValue());
    pop.close()
    spreadsheet.focus();
});
The event listener code will be invoked when the user perform the related action in the UI. Once the event is capture, we can use the setCellValue method (in this case) to change the properties of the target cell accordingly.
In conclusion
In addition to using the already powerful features of a spreadsheet, we can add more options for user interactions and workflows.
The spreadsheet itself is very user friendly due to familiarity, and the addition of java-based programming and the whole range of additional controls from the web multiply its capabilities.