application · Aug 5, 2020
Automate your Excel-based workflow in Java -- Invoice Builder Example
 Hawk Chen
Developer, Keikai.
Hawk Chen
Developer, Keikai.
After helping my colleague in the administration department turning her Excel file into a Buy Currency Web App, I now have the chance to help my colleague in the sales department by automating their invoice-generating process. In this article, I will share with you how I did it.
Create an Invoice with Excel templates
For salespersons, it is very common to create an invoice with Excel. But the process usually involves many error-prone manual actions like inputting data, copy/pasting,... etc. My colleague, like any salesperson, wishes that the data can be populated from the database into the invoice Excel template automatically, instead of having to input it manually. Therefore I took the time and created a web application, Invoice Builder, and turned such a manual process into an integrated, automated process leveraging Excel files, Java and, Keikai.
Here is a short clip of usage:
Architecture
The image below shows the architecture of invoice builder application:
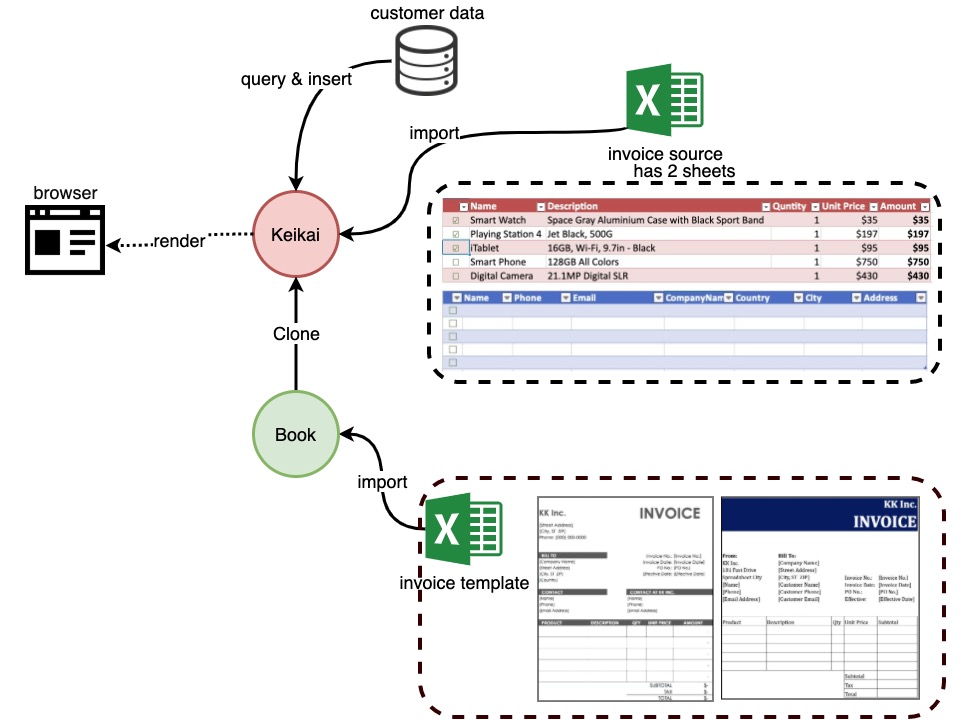
- Initially, I import a source Excel file that has 2 empty tables -- the customer table and product table. A salesman will select customers and products from these tables.
- Customer and product data is populated into the corresponding tables based on database queries.
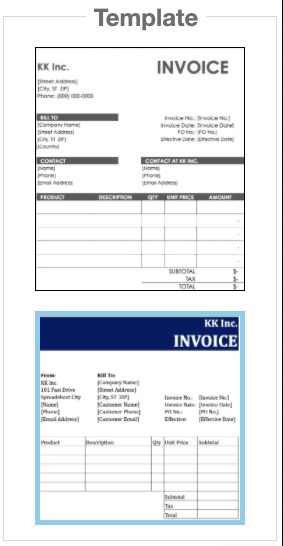
- We also import 2 invoice templates; they are created in Excel by our salesman. These templates will be used later.
- Workflow: after selecting customers and products, the app will create invoices by combining customer and product data with the selected invoice template.
Building UI
The first step is to build the UI for this app. Since our salesman is used to work with Excel templates, we use Keikai Spreadsheet here so that he can continue using his existing templates. To give you a quick background, Keikai is based on ZK UI framework which provides a complete set of UI components, and an XML-formatted UI language, ZUL. Following ZK's syntax, I build this web application's UI with the following UI components in XML tags:
<hlayout vflex="1" width="100%" apply="io.keikai.devref.usecase.invoice.InvoiceBuilderController">
    <spreadsheet height="100%" id="spreadsheet" hflex="8"
                maxVisibleRows="6" maxVisibleColumns="8"
                src="/WEB-INF/books/invoice-source.xlsx"
                showSheetbar="true"/>
    <vlayout hflex="2" height="100%">
        <groupbox id="templateBox" title="Template" style="text-align: center">
        </groupbox>
        <button id="create" label="Create" style="float: right"/>
    </vlayout>
</hlayout>
<spreadsheet>: keikai spreadsheet.<hlayout>: It layouts its child components horizontally in a row, and<vlayout>layouts components vertically.<groupbox>: It groups components with a border and a title.
Each tag supports some attributes, for example:
src: specify an Excel file path to be imported into Keikai.maxVisibleRows: controls the maximum visible rows when keikai renders a sheet in a browser.
For the complete attribute list, please refer to Keikai Developer Reference and ZK Component Reference.
MVC pattern
I am used to working with MVC and Keikai does support that. Let me explain each role under the context of Keikai:
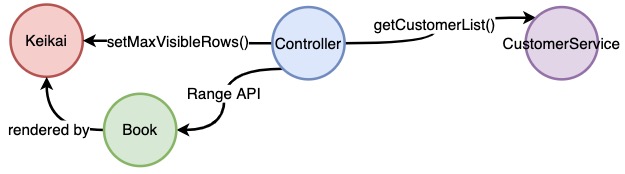
- View : An XML file written in ZUL. ZK translates a zul file into UI components and renders in your browsers.
- Controller: A Java class that extends ZK
SelectorComposerthat listens to events fired from View and control ZK UI components. It controls Keikai bySpreadsheetandRangeAPI. - Model: In my case, it's
CustomerService, but it could be any of your java business classes, e.g. authentication, data query
Specify a Controller
To specify a Controller for a page, I specify a full-qualified class name at apply attribute:
<hlayout vflex="1" width="100%" apply="io.keikai.devref.usecase.invoice.InvoiceBuilderController">
...
</hlayout>
Then this controller can control <hlayout> and its child components. I usually specify a controller at the root component on a page.
Build UI in Java
Personally, I like to work with zul because it is easy to read. If you prefer to work with pure Java (like Swing) instead of using zul, it is also possible. You can create a component with new Image(), add a component into a Groupbox (container) by appendChild(), and register an event listener with addEventListener(). With those API, you can dynamically create template preview images upon a template list array inside a groupbox:
@Wire
private Groupbox templateBox;
private String[] templateFileNameList = {"invoice-template1.xlsx", "invoice-template2.xlsx"};
...
private void buildTemplatePreview() {
    ...
    Arrays.stream(templateFileNameList).forEach(fileName -> {
        ...
        Image preview = new Image(fileNameWithoutExt + "-preview.jpg");
        templateBox.appendChild(preview);
        preview.setAttribute(TEMPLATE_KEY, fileName);
        preview.addEventListener(org.zkoss.zk.ui.event.Events.ON_CLICK, event ->
                selectTemplate((Image) event.getTarget()));
        ...
    });
    ...
}
Populate customers from a database
Now that we can display the spreadsheet and the source file, we need to populate data into the table.
The source Excel file just contains an empty customer table with table styles like column names and header colors. One good thing here is that this Excel file is created by my salesperson using Excel -- he knows better what he wants to see in this table.

I load customer list from a service class and populate the list into the table:
private void populateCustomers() {
    List<String[]> customers = CustomerService.getCustomerList();
    Range startingCell = customerTable.toCellRange(0, 1); //the 1st column is for checkbox
    for (String[] c : customers) {
        RangeHelper.setValuesInRow(startingCell, c);
        startingCell = startingCell.toShiftedRange(1, 0);
    }
}
CustomerServicecould also be any Java class that provides data entities in your case.setValuesInRow()fills multiple cells one by one in a row with an array of string, e.g. B2, C2, D2...toShiftedRange(1, 0)shiftsstartingCellto the next row.
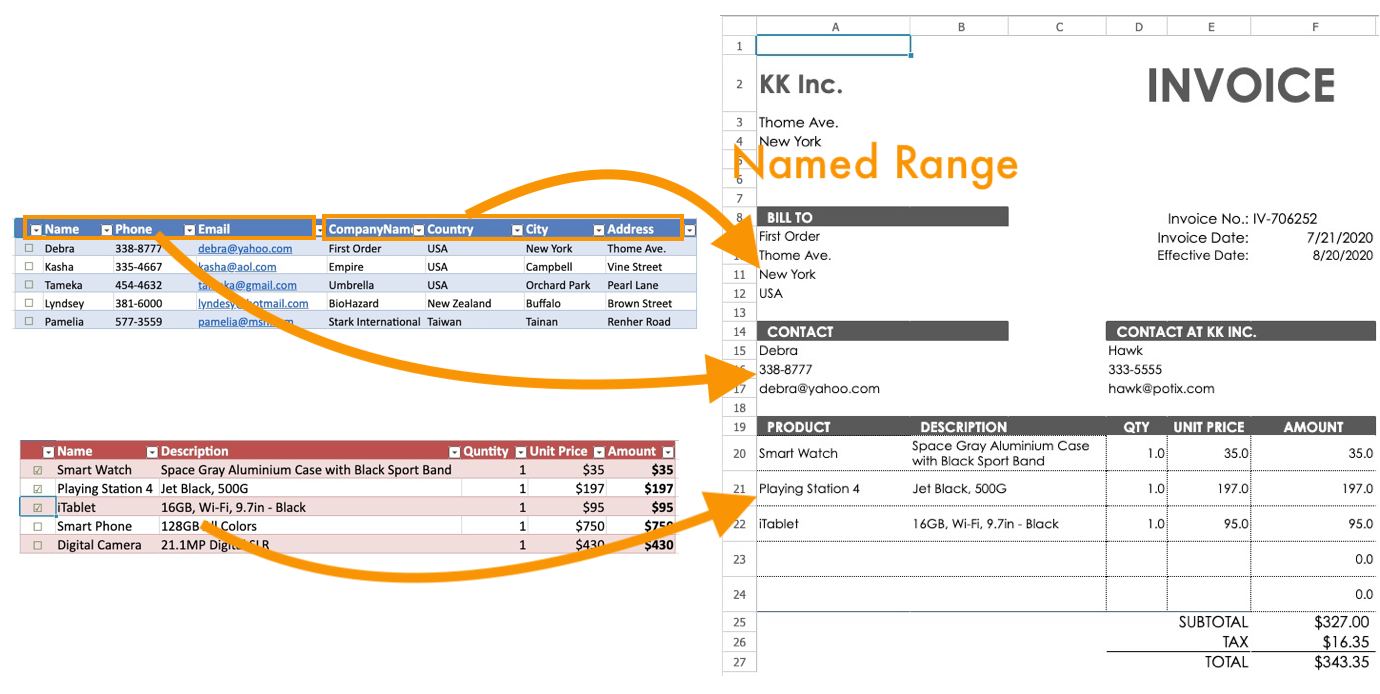
Populate data with named ranges
When populating data to the spreadsheet UI, we need to specify the target cells that we wish to populate the data into. I go with Named Ranges as it is a flexible way. It works like a place holder in this application. Firstly, I create several named ranges in each template file e.g. Name, Phone, and Email for customer details. After an end-user selects customers and products, the controller extracts each row as a map. The key is header value, the value is the corresponding cell value, e.g. {Name: Debra, Phone: 338-8777, Email: debra@yahoo.com...}. Then I clone an invoice sheet from the selected template and populate customer details into the corresponding named ranges.
@Listen(org.zkoss.zk.ui.event.Events.ON_CLICK + "=#create")
public void createInvoice() {
    ...
    Book invoiceBook = Books.createBook("invoice.xlsx");
    for (Map customer : selectedCustomers) {
        Sheet invoiceSheet = Ranges.range(invoiceBook).cloneSheetFrom(customer.get("CompanyName").toString()
                , templates.get(getSelectedTemplateFileName()).getSheetAt(0));
        populateNamedRange(generateAgentData(), invoiceSheet);
        populateNamedRange(customer, invoiceSheet);
        ...
    }
    ...
}
/**
 * Each key in the specified fieldMap represents a named range, populate its value to the corresponding named range in the specified sheet
 */
private void populateNamedRange(Map<String, Object> fieldMap, Sheet sheet) {
    List<String> namedRanges = Ranges.getNames(sheet);
    fieldMap.forEach((name, value) -> {
        if (namedRanges.contains(name)) {
            Range range = Ranges.rangeByName(sheet, name);
            range.setCellValue(value);
        }
    });
}
User Permission Control
In this app, customer data is populated from the database, and we don't want our salespersons to change them. They should only select these records. Therefore, I limit what they can do on the UI in the following ways:
Hide Toolbar and Context Menu
I make the sheet tab visible by specifying showSheetbar="true". Everything else like the toolbar, formula bar, and the context menu is invisible by default. With this, users won't accidentally change what's displayed on the UI.
<spreadsheet ... showSheetbar="true"/>
Enable Sheet Protection & Disable Adding a Sheet
Then, I also enable sheet protection by protectSheet() to make all sheets read-only and forbid users adding a sheet by disableUserAction().
private void limitAccess() {
    for (int i = 0; i < spreadsheet.getBook().getNumberOfSheets(); i++) {
        Ranges.range(spreadsheet.getBook().getSheetAt(i)).protectSheet(SELECTION_FILTER);
    }
    spreadsheet.disableUserAction(AuxAction.ADD_SHEET, true);
}
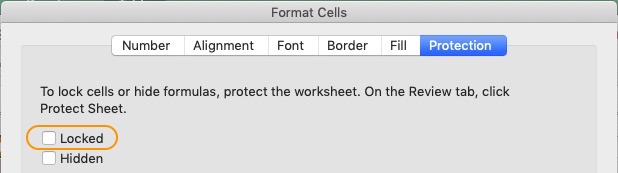
Editable Area under Sheet Protection
In Excel, you can uncheck locked status to make a cell editable under sheet protection. Other cells will remain read-only. With this setting, you can allow a range of editable area in a protected sheet. This setting will stay after importing to Keikai, so this can be done from the Excel side when we prepare the source files.
Reusing a Book
In this app, I have 2 Excel templates and I want to import them once and then use them whenever needed.
Keikai Importer converts an Excel xlsx file into a Book. You can assign the Book to Spreadsheet and render it to a browser. Alternatively, you can manipulate a Book with Range directly without assigning it to a Spreadsheet. The most-commonly usages are to clone sheets or copy cells from a template book. Everyone who needs the Excel template can grab content from them without importing the template file again.
In my application, I store the Book objects of 2 template Excel files in a Map (templateWarehouse) for future use:
private static HashMap<String, Book> templateWarehouse = new HashMap<>();
private static Importer importer = Importers.getImporter();
...
private void importInvoiceTemplate() {
    ...
        for (String fileName : templateFileNameList) {
            if (!templateWarehouse.containsKey(fileName)) { //avoid importing again
                templateWarehouse.put(fileName
                        , importer.imports(new File(WebApps.getCurrent().getRealPath(BookUtil.DEFAULT_BOOK_FOLDER)
                                , fileName), fileName));
            }
        }
    ...
}
importer.imports(new File(...))returns aBook
Summary
Through this example, I shared how you can turn your existing Excel file-based process into a web application with Excel files, Java, and Keikai. The app is integrated with back-end services including a database and user permission control. The same techniques can be applied to any other scenarios involving an Excel-based process, turning manual workflows into automated and integrated Web Apps.
Source Code
Check invoiceBuilder.zul and InvoiceBuilderController at Github