application · Mar 25, 2020
Turn manual Excel workflow into automated Web App
 Matthieu Duchemin
Developer, Keikai.
Matthieu Duchemin
Developer, Keikai.
Automating time-expensive tasks
My coworker in HR is doing a lot of interesting tasks, requiring people skills and mental sharpness. Payroll is not one of those. It’s a boring, soul-crushing job of reading a spreadsheet row by row, copying and pasting value to a payroll template, followed by a long time at the printer.
On top of that, there are a few people working on that spreadsheet, which increase the chances of missing a revision, or using an outdated copy. Being a friendly neighborhood IT staff, I’ve offered to make a better workflow for this process. It could be done locally with some heavy-duty scripting, but there are a few people who need direct access to the sheet. On top of that, I didn’t want to sink too much time in this side-task. Not every data-processing tool needs to be a 6-week development job with a list of dependencies long as the arm.
I also want them to be able to change the template structure and style directly in the workbook without having to touch the code, so they will need a nice worksheet editor
Typical desktop data and template task
Call me old fashioned, but I have a soft spot in my heart for the old “read from database, push to template field by field” workflow. With data and presentation well separated, you can add, remove, edit and read the content, while working in parallel on the nice-looking template which will receive the values.
The right tool for the right task
I’m using Keikai to turn this excel file into a web application. I just have to import the workbook in keikai, and use the Java client API to control it.
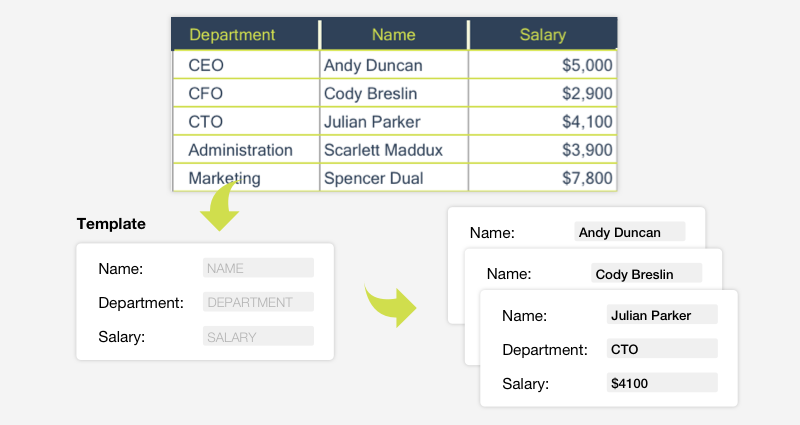
The big idea
Simply put, I want to read column headers, and automatically create a copy of the display template for each row. In each copy, I want to fill in the value of the cell matching the column name. Easy as pie.
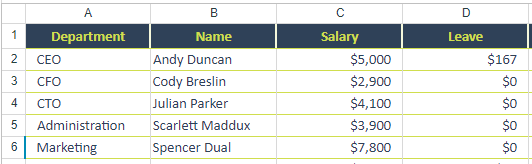
Well formatted data
Of course, the data must be readable. I’ve retrieved the original workbook, and just changed the formatting to follow my simple ruleset:
- All the data will be in a table named “PayrollTable”. Easy to target from the Java API, plus adding a line in the table will automatically make it included in my dataset.
- The first line of the table will contain headers. No data here, just the labels for the template fields.
- Each row in the table will be output to one copy of the template
In-browser template edition
Here’s the clever part. While the parsing and replacing is done in java, the application can be piloted directly by the user simply by editing the for template. Moving cells around, changing style, etc. All operations can be performed directly on the spreadsheet file, or through Keikai web UI.
Read data from excel, use it however you like
Let’s get to it. The API here is simple. Since I’ve named my target range, I can retrieve it with a single line:
Range payrollRange = Ranges.rangeByName(sheet, tableName);
There’s more to the API here, if you’d like a detailed read. The range object can then be queried line by line to extract data. First step, extracting the header to their own list.
List<String> headers = new ArrayList<String>();
for (int i = table.getColumn(); i < table.getColumnCount(); i++) {
    headers.add(table.toCellRange(-1, i).getCellValue().toString());
}
I can then use the header list as reference to store each line as maps of header and value. The resulting data structure will be close to JSON, easy to reuse, and is more optimized for a smaller dataset. For a larger dataset, a more memory efficient format could be a two-dimensional array.
Use named fields to fill values in a sheet
Almost done, I just need to make a copy of that template for each row of data and push the values to the relevant cells. The main question is how to identify the target cells. The simplest answer is — once again — named ranges. By assigning name ranges to the target cells and pushing values to these cells, I can easily find every target cell and apply the matching value from the Map representing the row. It's good to know that named ranges can be defined with a scope of sheet or book. A "book" scope name will be available to the whole workbook, while "sheet" scoped names are exclusive to the sheet itself. For this template, I've used sheet scope, since this allow me to clone the sheet without duplicating a "book" wide name.
private void generateAllTemplates(List<Map<String, Object>> allRows) {
    for (Map<String, Object> row : allRows) {
        Sheet cloneSheet = Ranges.range(spreadsheet.getBook().getSheet("Form")).cloneSheet((String) row.get("Name"));
        for (String head : row.keySet()) {
            Ranges.rangeByName(cloneSheet, head).setCellValue(row.get(head));
        }
    }
}
In conclusion
I was able to automate a boring task into a click-and-done workflow using only a few lines of Java and the Keikai library to control an excel spreadsheet. Designing with named ranges makes it easy to retrieve and write data to and from specific parts of the document without hardcoding values, which in turn makes the document extensible (new columns, new fields, moving fields or renaming them) and puts both the data and the formatting under the user’s control. It would also makes the table data available to be used in a different service entirely, such as writing to database, using in a business layer, etc.
Source Code
I hope this was as interesting to read as it was to make. The complete source code of this project is available on Github.
Just run the project and visit http://localhost:8080/dev-ref/usecase/payroll.zul