
Introduction
Excel is no doubt the most commonly used business application in the world. It is so easy that almost anyone can pick it up without learning. It is powerful in the sense that anyone can design a template and style it nicely; anyone can create custom reports or forms with its powerful built-in features like sorting, filtering, charting and conditional formatting; it even comes with advanced formula functions for professionals.
However, Excel Sheets are scattered among each user and require frequent uploading/downloading/emailing when traveling among systems and users.
What if we can seamlessly integrate these Excel Sheets into our workflow allowing the Sheets to always connect to the latest data from the database; be shared among multiple users in real-time; or automated with other systems? Spreadsheet users can continue working with the familiar Excel interface, while the IT department can have better control over the data. Business departments can even create their own forms and UI with Excel so that they can actually participate deeper in the application development with their domain know-how. Whenever a new form or report is needed, they can design and create the custom report or form just the way they do in Excel, without having to ask the IT department to create another program from scratch.
This article demonstrates how you can import a typical Excel template and turn it into a workflow application using Keikai.
Prerequisite
To better understand this article and its code example, I assume that you already have the basic knowledge of HTML and Java EE web components (JSP and servlet) and that you have read Keikai Getting Started. We are also using the ZK Framework to provide the application context, but knowledge of ZK is not necessary to follow this article.
Spreadsheet as an Application - A Workflow Application
Keikai is especially useful when building applications involving form filling or formula calculation. In this article, I will demonstrate how you can create a Form Submission Workflow Application with Keikai.
First, I'd like to share with you some background of this example. There are 2 roles in this application:
- Employee: can submit a form to the Supervisor.
- Supervisor: can approve or reject a form submitted by the Employee.
The whole workflow is as illustrated as below:
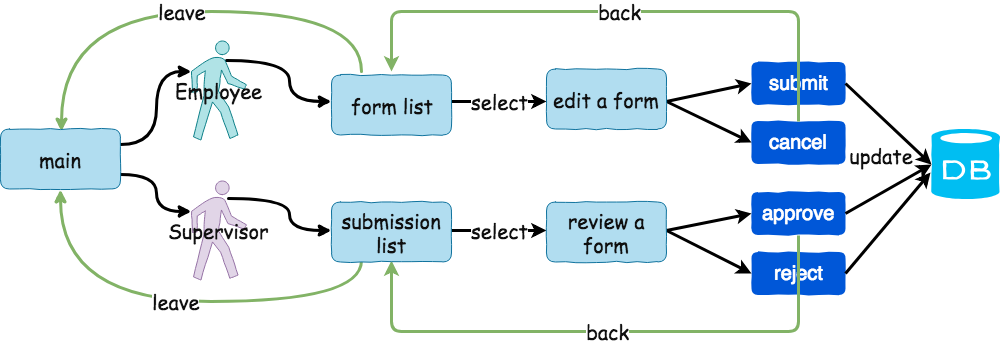
- main stage: the entry page where you can choose a role to enter the workflow.
- form list stage: if you are an Employee, it shows you 2 forms: form_leave.xlsx and business_trip.xlsx
- submission list stage: if you are a Supervisor, it shows you a submission table containing forms submitted by Employees.
- When you select a form (or submission), Keikai imports the corresponding xlsx form.
- edit a form stage: after a form is being imported, an Employee can fill out the form and submit or cancel.
- review a form stage: when a Supervisor clicks on a WAITING item in the submission list, the application imports the said form for approval/rejection.
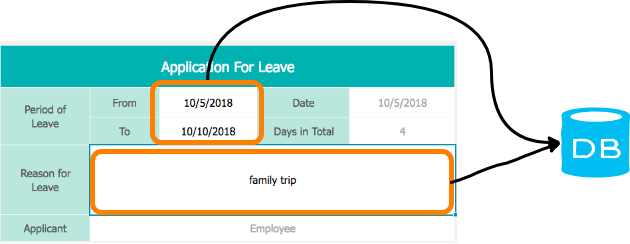
- When you click a submit/cancel/approve/reject conntrol in the form, the application will update the submission status accordingly to the database.
Form Template
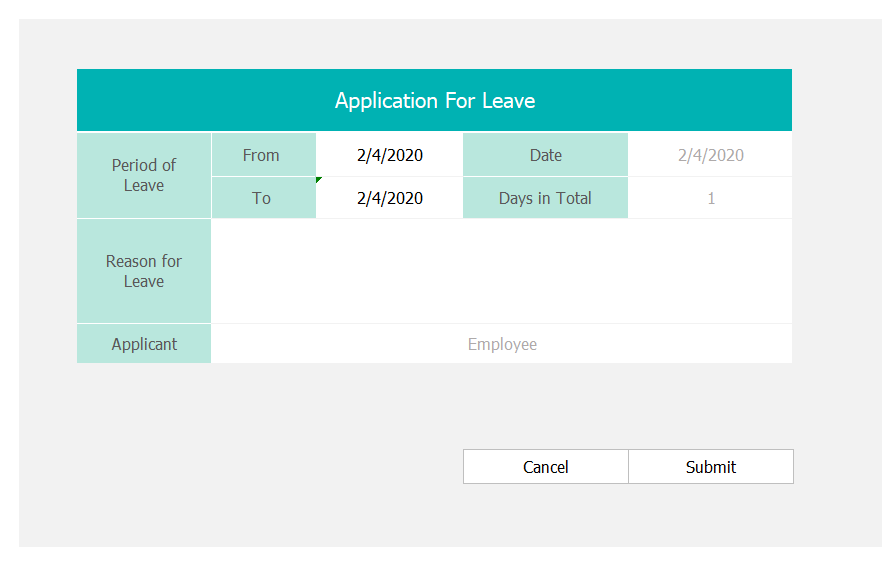
Assuming we already have an Application for Leave and a Business Travel Request form designed in Excel, and that we have already thought about the workflow and defined the roles. In this scenario, there should be 4 kinds of actions in each form: submit, cancel, approve, and reject:
leave form in Excel
Now we are ready to turn these templates into a Web application. First, we will quickly take a look at the architecture.
Architecture
From a Java implementation perspective, the architecture is:

ZK Framework: handle HTTP request/responseWorkflow Composer: A ZK composer (*), which implement the whole workflow logicWorkflowDao: query, insert, and update a form submission record in the database
(*) Composers are ZK objects that control part of a ZK page UI. They are used to listen to user action and to update the page based on user's choices.
Easy to Build Application UI
We start by building the UI. In this application, I build every page with a sheet which contains clickable cells for actions.
Keikai supports binding mouse clicks events on a sheet. You can treat a sheet as a page and put background colors on cells, a larger text as a title, and a data validation control for drop-down selection. Anyone who can use Excel can build a page, no technical skills are required.
First, I build a sheet to represent each workflow stage: the main sheet, form list sheet, and submission list sheet. Then, when a user moves among stages, I just need to switch to and display the corresponding sheets accordingly.
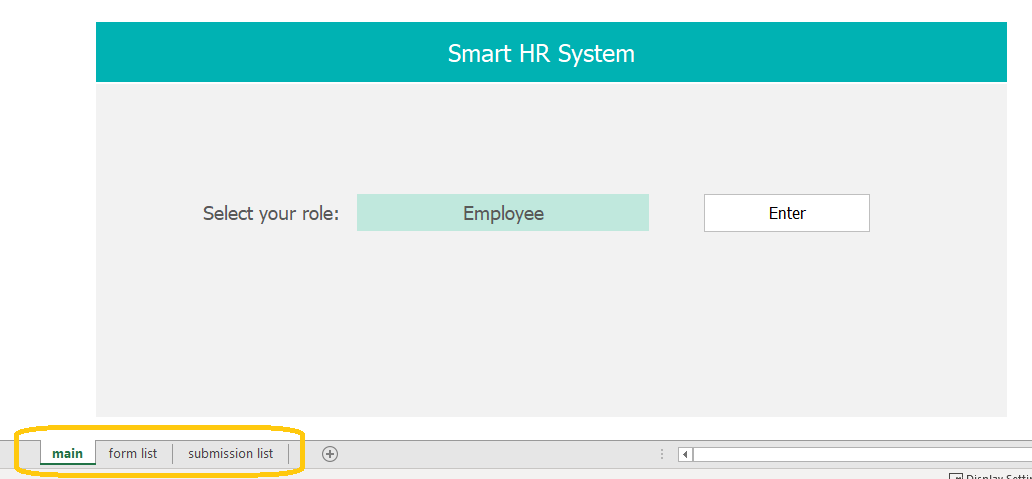
For example, when a user enters the application as an "Employee", the workflow application just activates (displays) "form list" sheet to the user. This is how we do page navigation easily.
Prevent User Mistakes
As mentioned in the previous section, anyone can build a UI page with a sheet easily. Here are some tips to keep in mind since these sheets will be used as part of the application.
Normally, users are free to edit any cell in a worksheet. But if I take a sheet as an application UI, I need to enable proper protection on the sheet to avoid them breaking the application. For example, if users delete a sheet or a role, then they can not enter or use the workflow anymore. This sounds funny but it could create unexpected issues in a business usecase.
So I need to define what users are allowed to do, to avoid such a disaster.
Hide Sheet Tabs
Hiding sheet tabs can avoid users performing any sheet operation such as switching sheets. With this, the application can fully control a user's stage transition without running into undesired surprises.
This can be done by set showSheetbar to false on the spreadsheet.
spreadsheet.setShowSheetbar(false);
Sheet Protection
Both the form list and the submission list are just a read-only list for selection, I don't want users to change these lists. Hence, I can easily make them read-only by sheet protection with the following API.
    private static final SheetProtection READ_ONLY = SheetProtection.Builder.create().withSelectLockedCellsAllowed(true).build();

    ...

    Ranges.range(spreadsheet.getSelectedSheet()).protectSheet(READ_ONLY);
If anyone tries to edit a cell, Keikai will pop up a warning message:
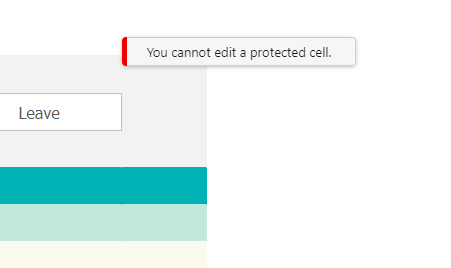
Note that even when the sheet is read-only, it is still possible to allow some user actions like selecting locked/unlocked cells, so that users can see a selection box when clicking a cell. Developers and designers can decide to turn on/off these actions depending on the actual use cases. For available user actions, please check the protectSheet JavaDoc and the SheetProtection JavaDoc.
Since I don't want users to edit cells in these sheets, I decided to hide the toolbar to avoid confusing users. This can be done directly on the spreadsheet object as shown below:
spreadsheet.setShowToolbar(false);
Sheet(Page) Navigation
In order to guide users going to the next stage(sheet) of the workflow, I need to add "button" clicking listeners and show the corresponding sheet to a user by activating the sheet.
When an Employee clicks the "Enter" button, I activate the "form list" sheet and it will lead him to that sheet:
The first step is to listen to click events from the spreadsheet object. In this case, I've used the ZK @Listen annotation on my onClick event listener.
When we loaded the spreadsheet, the active workbook received the name "MAIN". We will use this name to trigger the workflow handleClickMain(Event event);
add a listener for the spreadsheet ON_CELL_CLICK event
    @Listen(Events.ON_CELL_CLICK + "= #spreadsheet")
    public void onClick(CellMouseEvent event) {
        String sheetName = event.getSheet().getSheetName();
        ...
    }
- Use ZK event listeners to add a click event listener
Identify the current worksheet, and trigger the handleClickMain(Event event) method
    switch (sheetName) {
        case MAIN:
            handleClickMain(event);
            break;
    ...
from the main page, check for the user role, and open the relevant workbook
    private void navigateToList() {
        switch (currentRole) {
            case SUPERVISOR:
                navigateTo(SUBMISSION_LIST);
                break;
            case EMPLOYEE:
                navigateTo(FORM_LIST);
                break;
        }
    }
Change the view to a different sheet in the workbook
    private void navigateTo(String sheetName) {
        spreadsheet.setSelectedSheet(sheetName);
        if (MAIN.equals(sheetName)) {
            spreadsheet.focusTo(roleCell.getRow(), roleCell.getColumn());
        }
    }
- call
spreadsheet.setActiveWorksheet(SHEET_FORM)to select a sheet by its name.
The same technique can be applied for "Cancel", "Approve", and "Reject" buttons, and when users click on these buttons I will show the corresponding sheets. Please check navigateTo(String sheetName) in WorkflowComposer.java.
Populate Form List
After activating the "form list" sheet, I populate form file list with Range setCellValue():
    for (int index = 0; index < submissionList.size(); index++) {
        Submission s = submissionList.get(index);
        Ranges.range(sheet, START_ROW + index, 2).setCellValue(s.getId());
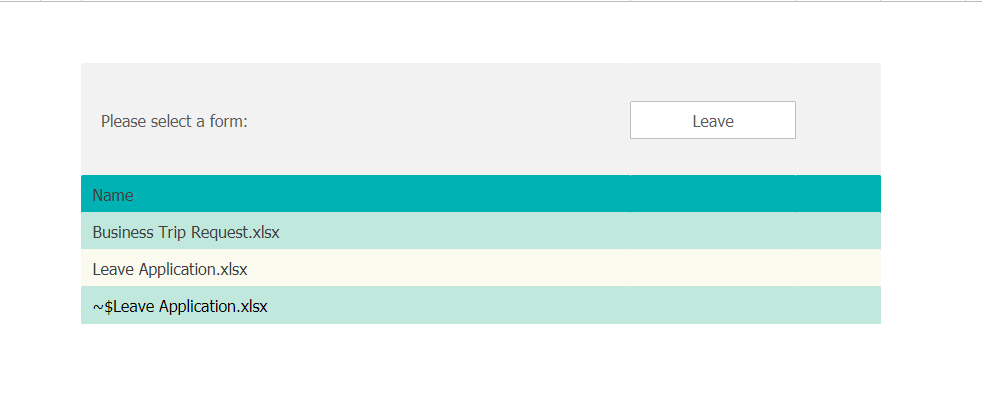
Show a Form
When an Employee selects a file in the form list by clicking a specific cell, I want to show him the corresponding form. To implement this, I need to listen to mouse click events on cells and check the value of the target cell to identify the form.
The event itself is retrived from the ON_CELL_CLICK listener declared above. Since our active page will be the form list, the listener will apply the method associated to this workbook.
From the spreadsheet ON_CELL_CLICK event, trigger the handleClickFormList(Event event) method
    @Listen(Events.ON_CELL_CLICK + "= #spreadsheet")
    public void onClick(CellMouseEvent event) {
        String sheetName = event.getSheet().getSheetName();
        switch (sheetName) {
        ...
        case FORM_LIST:
            handleClickFormList(event);
            break;
    }
- ZK will pass the mouse click event directly to the listener, and I can extract cell information (such as cell content, cell position, etc) direction from the Java object.
Retrieve the matching excel file from storage, and import it as the current workbook
    int index = getClickedCell(event).getRow() - START_ROW;
    ...
    File selectedForm = formList.get(index);
    try {
        Book book = Importers.getImporter().imports(selectedForm, selectedForm.getName());
        spreadsheet.setBook(book);
};
- The API will be able to retrieve the file from any source as long as it follows the excel format. It can be loaded from a storage layer, a database BLOB, the local drive, or any other source.
Show Buttons depending on the Role
There are in total 4 possible buttons in the sheet. However since an Employee can only Submit or Cancel a form, I have to hide some buttons and show only the relevant buttons upon their role. This can be done by renaming the 2 actual buttons dynamically while loading the form:
    private void addButtons(Sheet sheet) {
        Range button1 = Ranges.rangeByName(sheet, BUTTON1);
        Range button2 = Ranges.rangeByName(sheet, BUTTON2);
        switch (currentRole) {
            case SUPERVISOR:
                button1.setCellValue(REJECT);
                button2.setCellValue(APPROVE);
                break;
            case EMPLOYEE:
                button1.setCellValue(CANCEL);
                button2.setCellValue(SUBMIT);
                break;
        }
    }
The buttons button1 and button2 can then be used in a click listener. I can read they current name and trigger the associated method in the composer:
    private void handleClickForm(CellMouseEvent event) {
        Range button1 = Ranges.rangeByName(event.getSheet(), BUTTON1);
        Range button2 = Ranges.rangeByName(event.getSheet(), BUTTON2);
        Range clickedCell = getClickedCell(event);
        if (clickedCell.asString().equals(button1.asString())
                || clickedCell.asString().equals(button2.asString())) {
            String label = clickedCell.getCellValue().toString();
            switch (label) {
                case APPROVE:
                    approve();
                    break;
                case REJECT:
                    reject();
                    break;
                case SUBMIT:
                    submitForm();
                    break;
            }
            exitForm();
        }
    }
Unlocked Cells
I also want to prevent users from modifying some part of the form, so I protect the whole sheet and set editable cells unlocked in Excel. Then users can only edit these unlocked fields: From, To, and Reason for Leave:
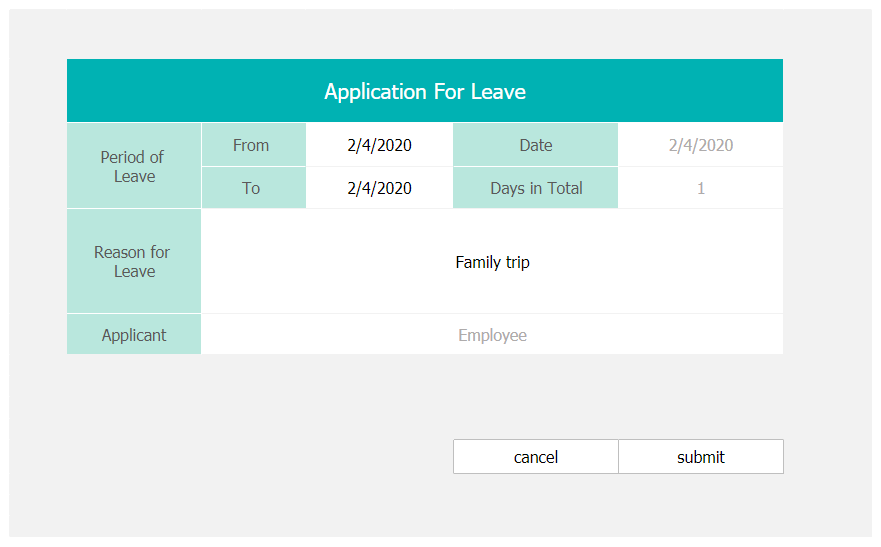
- All other cells are locked (read-only) under sheet protection.
You can also lock and unlock cells with API:
Apply locked cells on top of existing style properties
    for (String cell : cells){
        Range range = Ranges.range(spreadsheet.getSelectedSheet(), cell);
        CellStyle oldStyle = range.getCellStyle();
        EditableCellStyle newStyle = range.getCellStyleHelper().createCellStyle(oldStyle);
        newStyle.setLocked(true);
        range.setCellStyle(newStyle);
    }
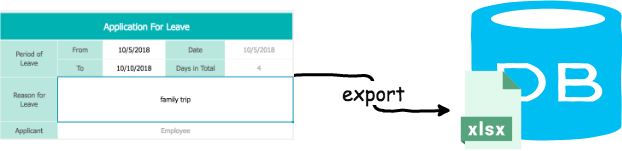
Submit a Form
When an Employee submits a form, I save the whole book content into the database so that a Supervisor can review later. Keikai supports exporting the whole workbook as a byte array, and I can store the workbook as a BLOB in a table.
    private void submitForm() {
        ByteArrayOutputStream outputStream = new ByteArrayOutputStream();
        try {
            lockCells();
            Exporters.getExporter().export(spreadsheet.getBook(), outputStream);
            Submission submission = new Submission();
            submission.setForm(outputStream);
            submission.setFormName(spreadsheet.getBook().getBookName());
            submission.setOwner(this.currentRole);
            workflowDao.insert(submission);
            submissionChange = true;
        } catch (IOException e) {
            throw new RuntimeException(e);
        }
    }
- This snippet creates a
Submissionobject and stores form content as aByteArrayOutputStream. Then it insertsSubmissioninto a table.
Once this is done, I can import the byte array and show the submitted form content with Keikai when needed.
Alternative Way to Store a Form
Instead of exporting the whole content, it is also possible to extract and store the cell values you care (e.g. From, To, Reason for Leave) into the database. When a supervisor reviews a form, just import the form template and populate these stored cell values from the database to corresponding cells.
Comparison of 2 Approaches
In the previous sections I have mentioned 2 approaches to store a workbook's content:
- exporting the whole workbook
- exporting the selected cell values
One of the advantages to export the whole workbook is that it will not be affected by any future form layout change because there is no code to extract specific cell value, like spreadsheeet.getRange("B2").getValue(). Therefore, if someone adds more rows or changes the position of "To" field in "Leave Application" form, I don't need to modify the Java code.
Also in the case where users are allowed to change the sheet layout and format, or in the case that you need to keep the change history of a file for a security reason, it is better to export the content and store it as a whole. The down-side of this approach is that it is not possible to query the content of the stored byte array by SQL, and it takes up more space.
If you take the 2nd approach and store only the cell values instead of the whole content, the advantage is that it separates the data and the file template clearly and saves storing spaces. Also, you can query data when needed. However, if the form is being changed later, you will need to modify the Java code about getting cell values of "From".
The best advice I can give is: choose the way that suits your requirement the most.
Implement Other Workflow Logic
You can also populate a Submission list queried from a database with the Range API:
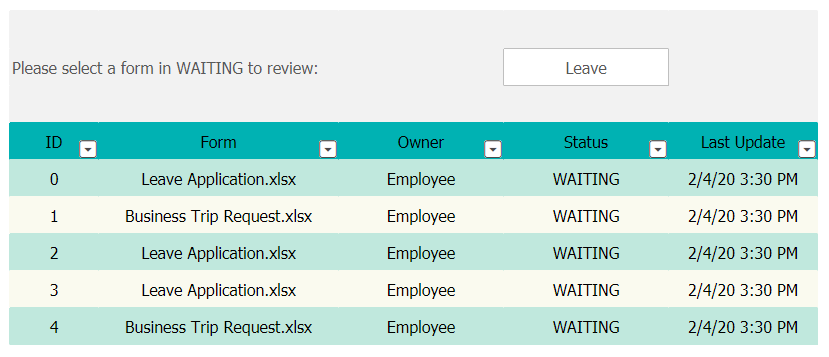
When a Supervisor clicks a submission in WAITING state, we should import the submitted byte array into Keikai spreadsheet. You can implement this with an event listener and a button action as I mentioned in the previous sections.
Benefits
I have demonstrated how you can build a workflow application easily using Keikai. To wrap up, the benefits are:
UI building is WYSIWYG
You can create all UI pages with spreadsheets, and no need to worry about dealing with any web UI frameworks. Anyone who knows how to use a Spreadsheet can build a page, and the resulting web page will just look like what you designed in the spreadsheet or Excel.
Business department can participate in the application building effortlessly
Since the end users are normally those who know the best about their business needs and process, it's better to let them create forms and pages by themselves instead of letting developers do the work. This can reduce the communication cost/loss between end users and the technical team.
Combine data and sheets seamlessly
With Keikai Range API, you can populate business data from the database into sheets. It also allows you to retrieve what user input into the sheet in your preferred way.
Apply business rules on form workflow
By adding event listeners on cells, you can apply your business rules implemented by Java to the whole workflow.
I Welcome Your Feedback
I have demonstrated how you can build a workflow application with Keikai. Feel free to tell us what other applications we can show you.