
A Typical Workflow Run by Excel
The other day a young lady in the administration department looked busy so I asked her what she was up to. She said that she has to visit several websites to check the currency rate, put them down in Excel and send it to her boss. The boss will then tell her to buy a certain currency at a certain amount. Finally, she has to keep the record in another Excel file. And this is one of her daily routines.
It is the year 2020. I was surprised that she still has to do lots of copy-paste routines and email Excel files around. My pride in being a developer wouldn't allow me, so I offered her that I will write a little program for her. Fortunately, with Keikai, I was able to do it in just 2 hours.
First, I asked her to lay out what she wishes to see in Excel. Then, I grabbed currency data from the internet and populated it to the desired cells. Next, I implemented page navigation to smoothen the workflow and finally I generated a report. That’s it!
Let me describe in detail about how each step was done.
Build UI with Excel
The best thing about using Keikai is that it takes your Excel file and renders almost the same in your browser. This means your Excel file is immediately turned into a web application UI.
This enables your business team, like the administrative lady, being able to join the system development easily by creating an Excel file as the UI.
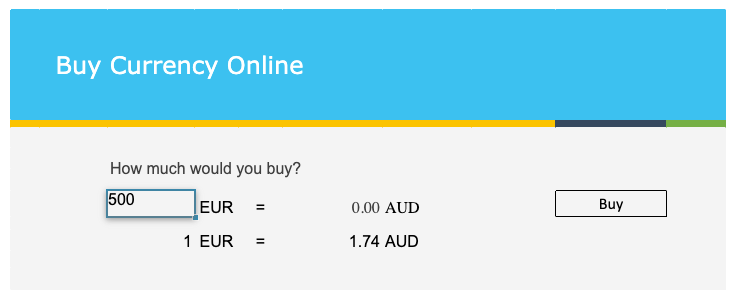
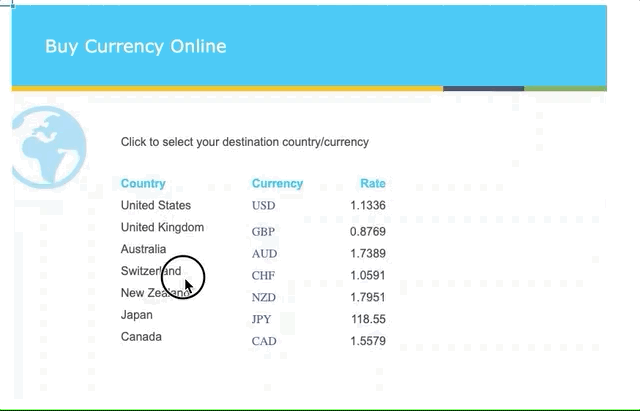
So the admin lady sent me her Buy-Currency Excel file: on the first screen, she expects to see a selected list of countries and their currency, and the currency data should be populated automatically. On the second screen, she expects to input the buying amount and the exchanged amount, and lastly, she expects to see a report generated automatically containing Dates, Currency, and Amounts.
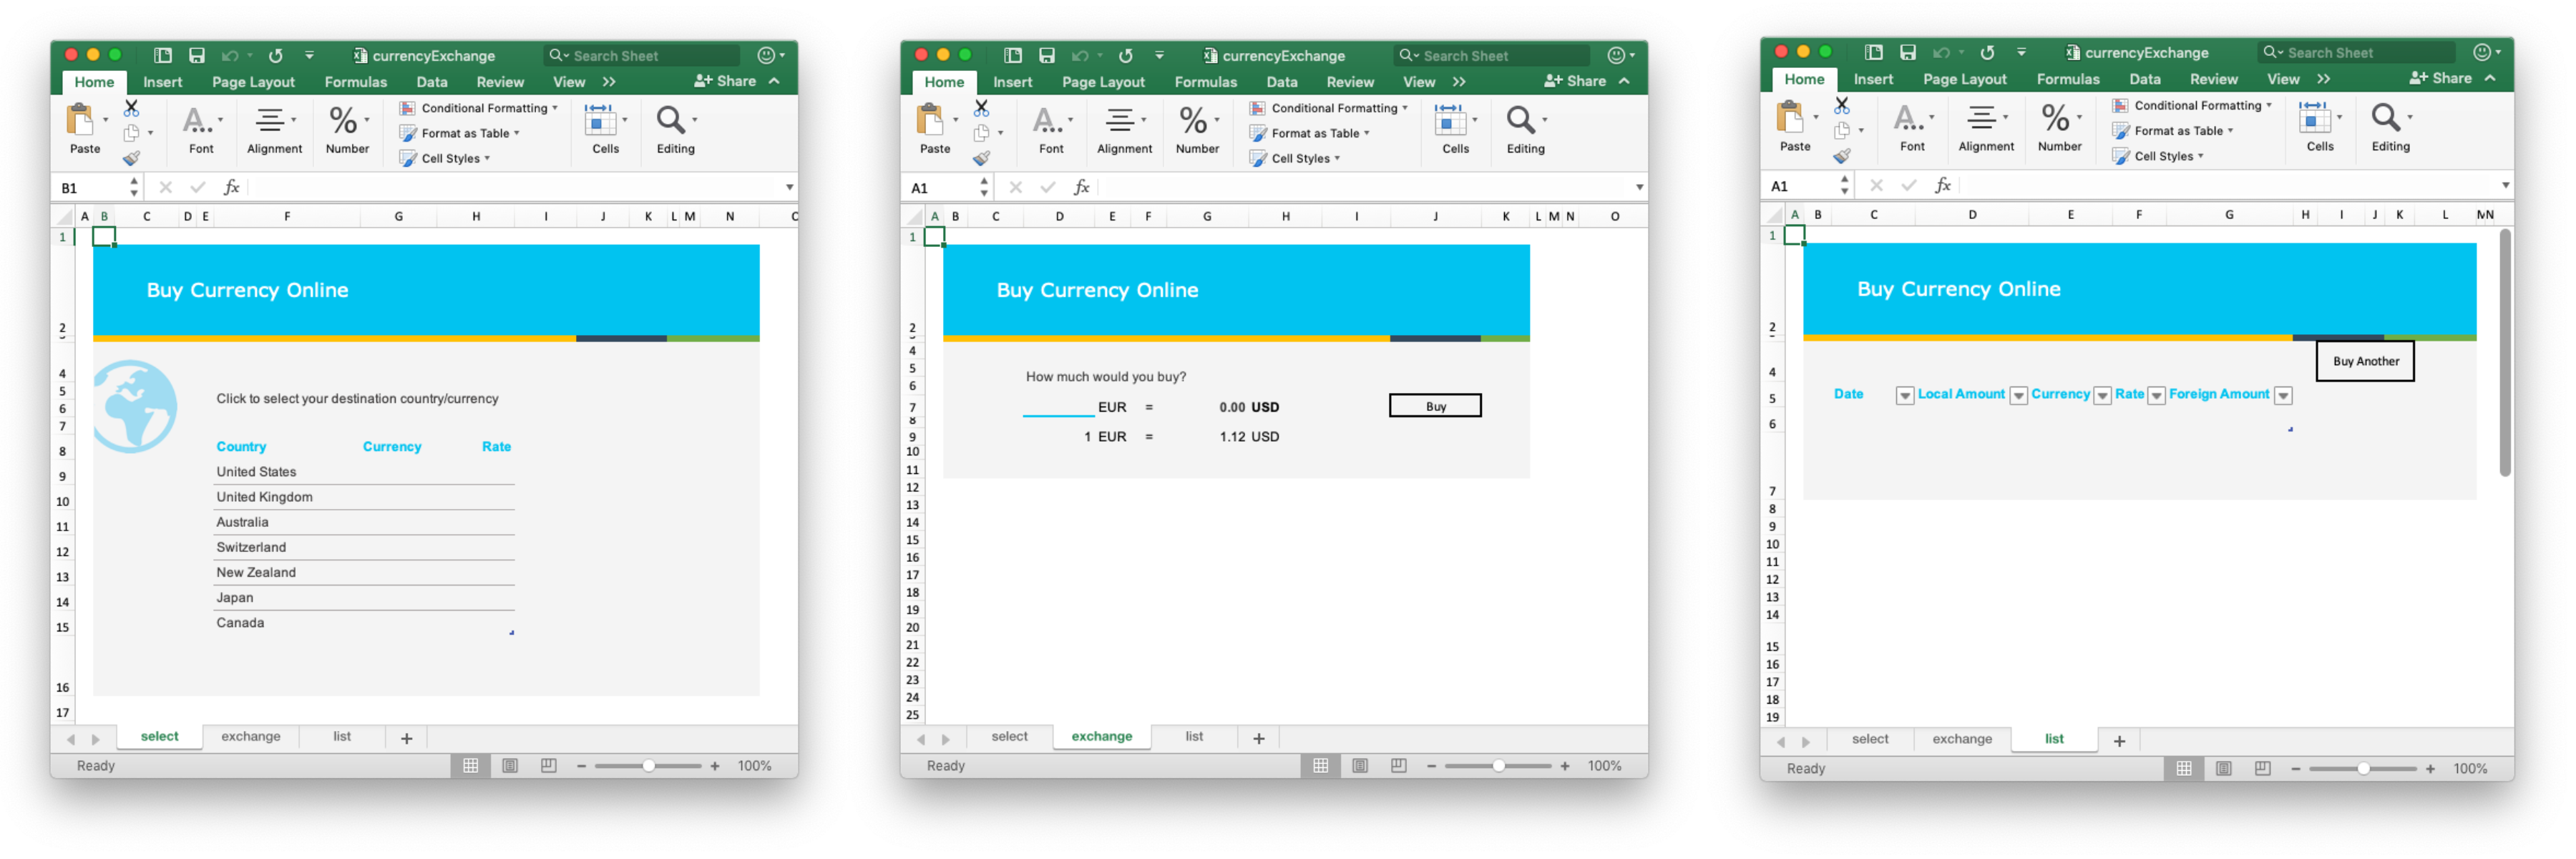
One-line importing
All I need to do here is to import the Excel file, and now the Excel template renders in my browser just like what she designed.
<spreadsheet height="100%" width="100%" src="/WEB-INF/books/currencyExchange.xlsx"/>
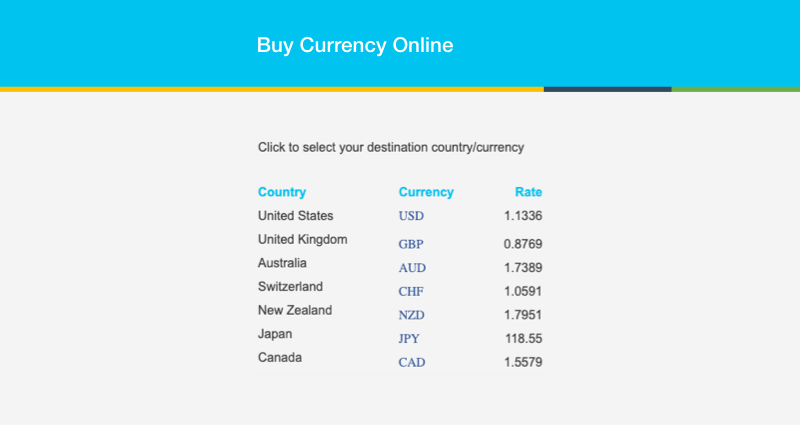
Show Data in a Table
Next, I filled in currency exchange rates retrieved from European Central Bank by Range.setCellValue() to the desired cells.
private void displayExchangeRate() {
    ...
    String[] INTERESTED_CURRENCY_LIST = {"USD", "GBP", "AUD", "CHF", "NZD", "JPY", "CAD"};
    int startingRow = 8;
    try {
        rates = ExchangeRateFetcher.fetch();
        for (String currency : INTERESTED_CURRENCY_LIST) {
            Ranges.range(spreadsheet.getSelectedSheet(), startingRow, 6).setCellValue(currency);
            Ranges.range(spreadsheet.getSelectedSheet(), startingRow, 6 + 1).setCellValue(rates.get(currency));
            startingRow++;
        }
    } catch (IOException e) {
        ...
    }
}
Now the admin lady can see the latest exchange rates being updated without visiting various websites.
Formula Supported
The Excel file she gave me contained formulas for calculating total exchanged amount according to the buying amount and exchange rate. But nothing to worry, I got formula supported on each cell out-of-the-box. Don't even need to enable it.
The lady can enter a formula according to her conditions without calculating numbers in her head, e.g. she can calculate how many notes she has in a cell and buys the same amount of USD.
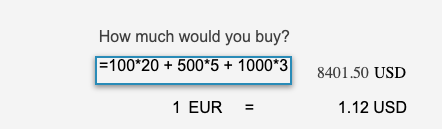
When I call Range.getCellValue(), I can get the calculated result of that formula. No need to parse the formula by myself. Isn't it great?
Page Navigation
Next, I will take care of page navigation – once she is done with the current page, take her to the next page. This can be done with Spreadsheet.setSelectedSheet(). The code below listens to the cell clicking event and switches to another sheet.
@Listen(Events.ON_CELL_CLICK + "=spreadsheet")
public void onCellClick(CellMouseEvent e) {
    String sheetName = e.getSheet().getSheetName();
    switch (sheetName) {
        case SELECT_SHEET:
            selectCurrency(e);
            break;
        case EXCHANGE_SHEET:
            buy(e);
            break;
        case LIST_SHEET:
            buyAnother(e);
            break;
    }
}

private void buyAnother(CellMouseEvent e){
    Range buyAnotherButton = Ranges.rangeByName(e.getSheet(), "buyAnother");
    if (e.getRow() == buyAnotherButton.getRow() && e.getColumn() == buyAnotherButton.getColumn()){
        spreadsheet.setSelectedSheet(SELECT_SHEET);
    }
}
Control Accessibility
Now that the application workflow has been implemented, but we need to implement some “safety” to make sure that she follows the desired path. By default, a user can edit any cell in a typical Excel file or spreadsheet. But when making a Web application, usually we wish users to follow the flow we defined. The following APIs are handy for controlling accessibility.
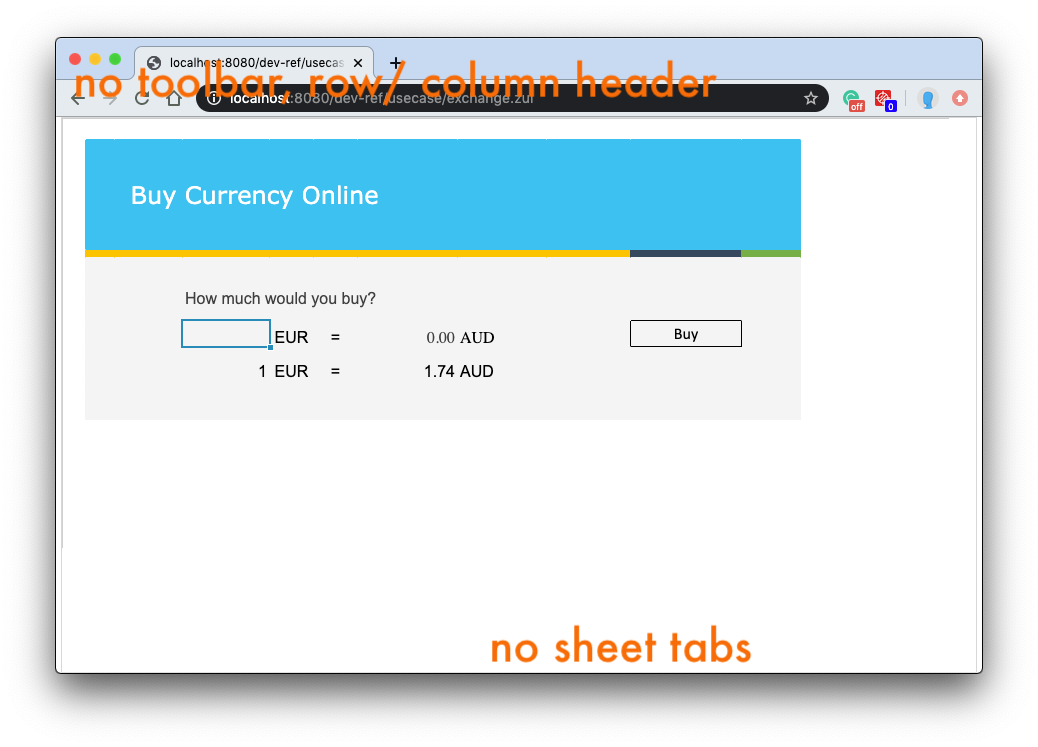
Customize UI to Be a Web Page
I customized the UI by hiding the column/row headers, toolbar, context menu, and sheet tabs with component tag attributes to avoid users accidentally click on them. By default, the toolbar, context menu, and sheet tab are already hidden and I need to only hide column and row headers:
<spreadsheet ... hidecolumnhead="true" hiderowhead="true"/>
Limit Visible Area
Also, to let her concentrate on the application, I decided to show a smaller area instead of showing her the whole sheet, so she won't scroll to the end of the world (sheet):
<spreadsheet ... maxVisibleColumns="15" maxVisibleRows="20" .../>
Such customization can prevent her from making undesired changes with these APIs, like deleting a sheet (page) by accident. Such UI also make the whole spreadsheet more like a normal page instead of a spreadsheet editor in a web application.
Protect a Sheet to be Read-only
But hiding the toolbar and the context menu is not enough because users can still edit cells arbitrarily. Therefore, I enabled sheet protection to make the whole sheet read-only so that she won’t accidentally delete a currency row or change a currency rate.
private static final SheetProtection VIEW_ONLY = SheetProtection.Builder.create().withSelectLockedCellsAllowed(true).withSelectUnlockedCellsAllowed(true).withAutoFilterAllowed(true).build();
...
private void protectAllSheets() {
    for (int i = 0; i < spreadsheet.getBook().getNumberOfSheets(); i++) {
        Ranges.range(spreadsheet.getBook().getSheetAt(i)).protectSheet(VIEW_ONLY);
    }
}
Since there are 15 different permissions of a SheetProtection, I created a SheetProtection object with a Builder pattern API, SheetProtection.Builder which is a more readable code style.
Limit Editable Area
Now that I’ve made the whole sheet read-only, she can’t edit anywhere. I need to unlock the cells where she needs to input the buying cost in the sheet:
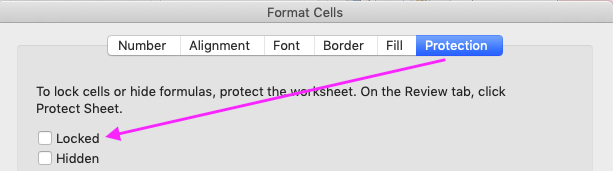
So that cell (D7) becomes the only one editable cell in the read-only sheet:
Transaction Report
In the last page, I will show a list of currency transactions in a table.
private void placeAnOrder(double cost, double amount) {
    Sheet sheet = spreadsheet.getBook().getSheet(LIST_SHEET);
    insert1stRow(sheet);
    //locate the 1st cell based on the header because insertion causes a name range shifted
    Range firstCell1stRow = Ranges.rangeByName(sheet, "header").toShiftedRange(1,0);
    Range fillCell = firstCell1stRow;
    fillCell.setCellValue(DateUtil.getExcelDate(new Date()));
    fillCell = fillCell.toShiftedRange(0, 1);
    fillCell.setCellValue(cost);
    fillCell = fillCell.toShiftedRange(0, 1);
    fillCell.setCellValue(destinationCurrency);
    fillCell = fillCell.toShiftedRange(0, 1);
    fillCell.setCellValue(rates.get(destinationCurrency));
    fillCell = fillCell.toShiftedRange(0, 1);
    fillCell.setCellValue(amount);
}
Keikai also saves your efforts to maintain a table's style including background color, borders, font, and filters when inserting and deleting rows. You just need to call insert(), and Keikai handles all changes on the related styles for you.
Filter Rows without Coding
Since I enabled the filter in Excel, Keikai also enables it after importing. After the lady places an order for many times, she may wish to filter some rows according to the criteria, e.g. list only the EUR to AUD transactions:
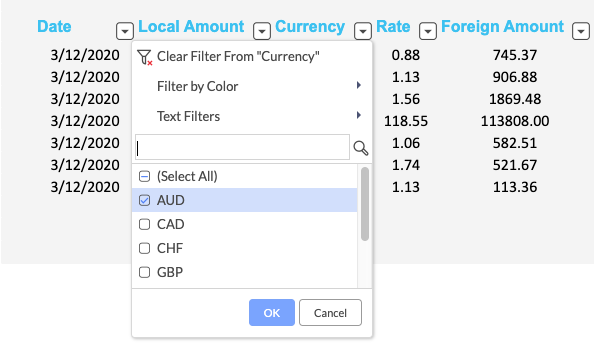
Filtered Result

Even if a filter was not enabled in the Excel file, I can enable the filter programmatically through Keikai API: Range.applyAutoFilter()
The whole usage is like:
I hope she will appreciate this little arrangement I made.
Through these steps, I can turn a traditional workflow of sending Excel forms into a web application. The Excel forms immediately become your system UI, and all my colleagues can effortlessly migrate to Keikai-based web system because they can execute workflows with a familiar UI without extra learning.
Source Code
I hope you enjoyed reading my article. The complete source code of the "buy currency" application mentioned in this article is available at Github.
Just run the project and visit http://localhost:8080/dev-ref/usecase/exchange.zul